We've got the steps you need to know to get Windows 10 installed on your computer. Whether you're putting it on a computer for the first time, upgrading an earlier version of Windows, or just want to perform a clean installation on a computer that already has Windows 10 on it .
1. Make sure your device meets the minimum system requirements
For the latest version of Windows 10, you’ll need to have the following:
CPU: 1GHz or faster supported processor (Here is a list of supported CPUs)
RAM: 1GB for Windows 10 32-bit or 2GB for Windows 10 64-bit
Storage: 32GB of space or more
GPU: DirectX 9 compatible or later with WDDM 1.0 drriver
Display: 800x600 resolution or greater
Internet connection: Some versions of Windows 10 require an internet connection during setup.
2. Create installation media
Microsoft has a tool specifically for creating installation media. You can download that tool using this link, or by going to this page and selecting “Download tool now” under the section titled “Create Windows 10 installation media.”
You’ll need a blank USB drive with at least 8GB of space (or a blank DVD) to put the Windows 10 installation files on.
You’ll need to run the tool, accept Microsoft’s terms, and then select “Create installation media for another PC” when you get to the “What do you want to do?” page.
You’ll select the language and edition of Windows you want as well as whether it will be 32-bit or 62-bit, and then select the type of media you want to use. Installing from a USB drive is easiest, but you can find details on using a DVD and ISO file here. You’ll then choose your USB drive from a list of drives, and the tool will download the necessary files and put them on the USB drive.
(Note: If you are upgrading a Windows 7 or Windows 8.1 PC, you can actually use this tool to simply download and install Windows 10 directly to your computer. Just run the program as an administrator, and when you reach the “What do you want to do?” section, select “Upgrade this PC now,” and follow the remaining steps in the tool. This will also give you the option of keeping your files and apps during the installation process. You can find more detailed instructions on this process here.)
3. Use the installation media
Insert your installation media into the computer you plan to install Windows 10 on, then access your computer's BIOS or UEFI.
This is the system that allows you to control some aspects of your computer's hardware, and it's built into your motherboard. This step is unique to your specific hardware, so we can't walk you through exactly what to do. But, you should be able to figure out the process for accessing this by checking on your computer or motherboard manufacturer’s website.
Generally accessing a computer's BIOS or UEFI involves holding a specific key during the boot process, often Escape, F1, F2, F12, or Delete. So, figure out which key your computer uses, then shut it down. Boot it back up, and hold the necessary key as soon as it starts to boot.
4. Change your computer's boot order
Advertisement
In your computer's BIOS or UEFI, you'll need to find the settings for boot order. This may show up in a section called "Boot" or "Boot order." This decides which devices are used first when the computer starts up.
The computer won't boot into the Windows 10 installation tool unless the drive it's on is higher up in the boot order than the drive holding the computer's current operating system.
You should move the drive (whether it's your USB drive or a DVD drive) to the top of the boot order menu.
You may also need to disable Secure Boot if your computer uses it.
5. Save settings and exit BIOS/UEFI
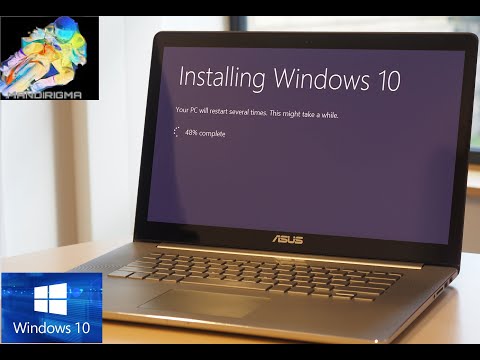
Your computer should now boot into the Windows 10 installation tool, which will guide you through the process of setting up Windows 10 on your computer.
1. Make sure your device meets the minimum system requirements
For the latest version of Windows 10, you’ll need to have the following:
CPU: 1GHz or faster supported processor (Here is a list of supported CPUs)
RAM: 1GB for Windows 10 32-bit or 2GB for Windows 10 64-bit
Storage: 32GB of space or more
GPU: DirectX 9 compatible or later with WDDM 1.0 drriver
Display: 800x600 resolution or greater
Internet connection: Some versions of Windows 10 require an internet connection during setup.
2. Create installation media
Microsoft has a tool specifically for creating installation media. You can download that tool using this link, or by going to this page and selecting “Download tool now” under the section titled “Create Windows 10 installation media.”
You’ll need a blank USB drive with at least 8GB of space (or a blank DVD) to put the Windows 10 installation files on.
You’ll need to run the tool, accept Microsoft’s terms, and then select “Create installation media for another PC” when you get to the “What do you want to do?” page.
You’ll select the language and edition of Windows you want as well as whether it will be 32-bit or 62-bit, and then select the type of media you want to use. Installing from a USB drive is easiest, but you can find details on using a DVD and ISO file here. You’ll then choose your USB drive from a list of drives, and the tool will download the necessary files and put them on the USB drive.
(Note: If you are upgrading a Windows 7 or Windows 8.1 PC, you can actually use this tool to simply download and install Windows 10 directly to your computer. Just run the program as an administrator, and when you reach the “What do you want to do?” section, select “Upgrade this PC now,” and follow the remaining steps in the tool. This will also give you the option of keeping your files and apps during the installation process. You can find more detailed instructions on this process here.)
3. Use the installation media
Insert your installation media into the computer you plan to install Windows 10 on, then access your computer's BIOS or UEFI.
This is the system that allows you to control some aspects of your computer's hardware, and it's built into your motherboard. This step is unique to your specific hardware, so we can't walk you through exactly what to do. But, you should be able to figure out the process for accessing this by checking on your computer or motherboard manufacturer’s website.
Generally accessing a computer's BIOS or UEFI involves holding a specific key during the boot process, often Escape, F1, F2, F12, or Delete. So, figure out which key your computer uses, then shut it down. Boot it back up, and hold the necessary key as soon as it starts to boot.
4. Change your computer's boot order
Advertisement
In your computer's BIOS or UEFI, you'll need to find the settings for boot order. This may show up in a section called "Boot" or "Boot order." This decides which devices are used first when the computer starts up.
The computer won't boot into the Windows 10 installation tool unless the drive it's on is higher up in the boot order than the drive holding the computer's current operating system.
You should move the drive (whether it's your USB drive or a DVD drive) to the top of the boot order menu.
You may also need to disable Secure Boot if your computer uses it.
5. Save settings and exit BIOS/UEFI
Your computer should now boot into the Windows 10 installation tool, which will guide you through the process of setting up Windows 10 on your computer.
- Kategorien
- PC (Windows/Mac/Linux) Anleitungen
Kommentare deaktiviert.
Als nächstes
-
00:59

Mein Windows 10 USB Stick hat KEINE install.wim, sondern install.esd | Lösung für Windows 11
-
07:15
Paano Mag Install ng Windows 10
-
10:36
how to format computer | install windows 10 from bootable usb/install original windows free sinhala
-
09:19
How to install Windows 11 on VirtualBox 2021 || How to install Windows 11 || Windows 11 64 bits
-
41:21
Install 2 Windows in One Laptop/PC | Install Windows 10 on Virtualbox (UEFI, BIOS) | Redwan Ahammod
-
12:39
Paano mag reformat ng Laptop/Desktop PC Windows installation Tagalog Philippines
-
10:57
Paano Gumawa Ng 4 Pics 1 Word sa PowerPoint
-
20:54
How to install windows 10 from usb।। Windows 10 kaise install kare। विंडोज 10 कैसे इनस्टॉल करें
-
11:09
How To Install Windows 11 || No Data Loss || Install on Any PC/Laptop || Dual Boot with Windows 10
-
18:36
Windows 10 Install Karny ka Tariqa || How to Install Windows 10 in Urdu/Hindi I Short video Guide
-
3:17:16

-
11:56

10 Monate später: CheckUp nach Restauration #Nachuntersuchung
-
07:51

Achsmanschette Tragegelenke und Spurstangenkopf wechseln Pajero Sport - Tutorial
-
10:08:29

-
30:09

47 RFT verseilt nochmal!
-
25:09

-
16:13

3 Zoll TRINKWASSERLEITUNG durchgerostet - Das Leben als Heizungsbauer
-
23:01

-
1:02:47

Einfach reparieren?!
-
07:33
LEGO mit einem PS4 Controller fernsteuern? BrickController 2 Tutorial